Everything happens in a browser, on the box’s own Wi-Fi hotspot. No app to install, no code to scan, no account to create first.
Hands-on time: ~5 minutes · Tools: none · Needed: a phone or laptop with Wi-Fi, plus Ethernet or Wi-Fi for the box itself. The wizard also runs a system update, which can take longer and reboots the box.

What’s in the box

  • ClawBox unit (NVIDIA Jetson Orin Nano 8 GB)
  • 512 GB NVMe SSD with the OS pre-installed
  • 20 W USB-C power adapter
  • Ethernet cable

Setup steps

1

Unbox and power on

Place the unit on a flat, ventilated surface, plug in Ethernet if you have it (recommended — it is the most reliable path), then connect the power adapter.
2

Join the ClawBox-Setup hotspot

After about a minute the box broadcasts its own Wi-Fi network, ClawBox-Setup — open at this point (the password you give it in the wizard’s security step applies the next time the hotspot starts). Join it from your phone or laptop. Its appearance in your Wi-Fi list is the signal that the box is ready.
3

Open the wizard

Browse to http://10.42.0.1. If your home network already uses 10.42.0.0/24, the box falls back to http://10.43.0.1.Some phones pop the page up on their own when they join the hotspot, but many will not — ClawBox does not hijack DNS to force it (see Networking), so typing the address is the reliable path.
4

Run the five-step wizard

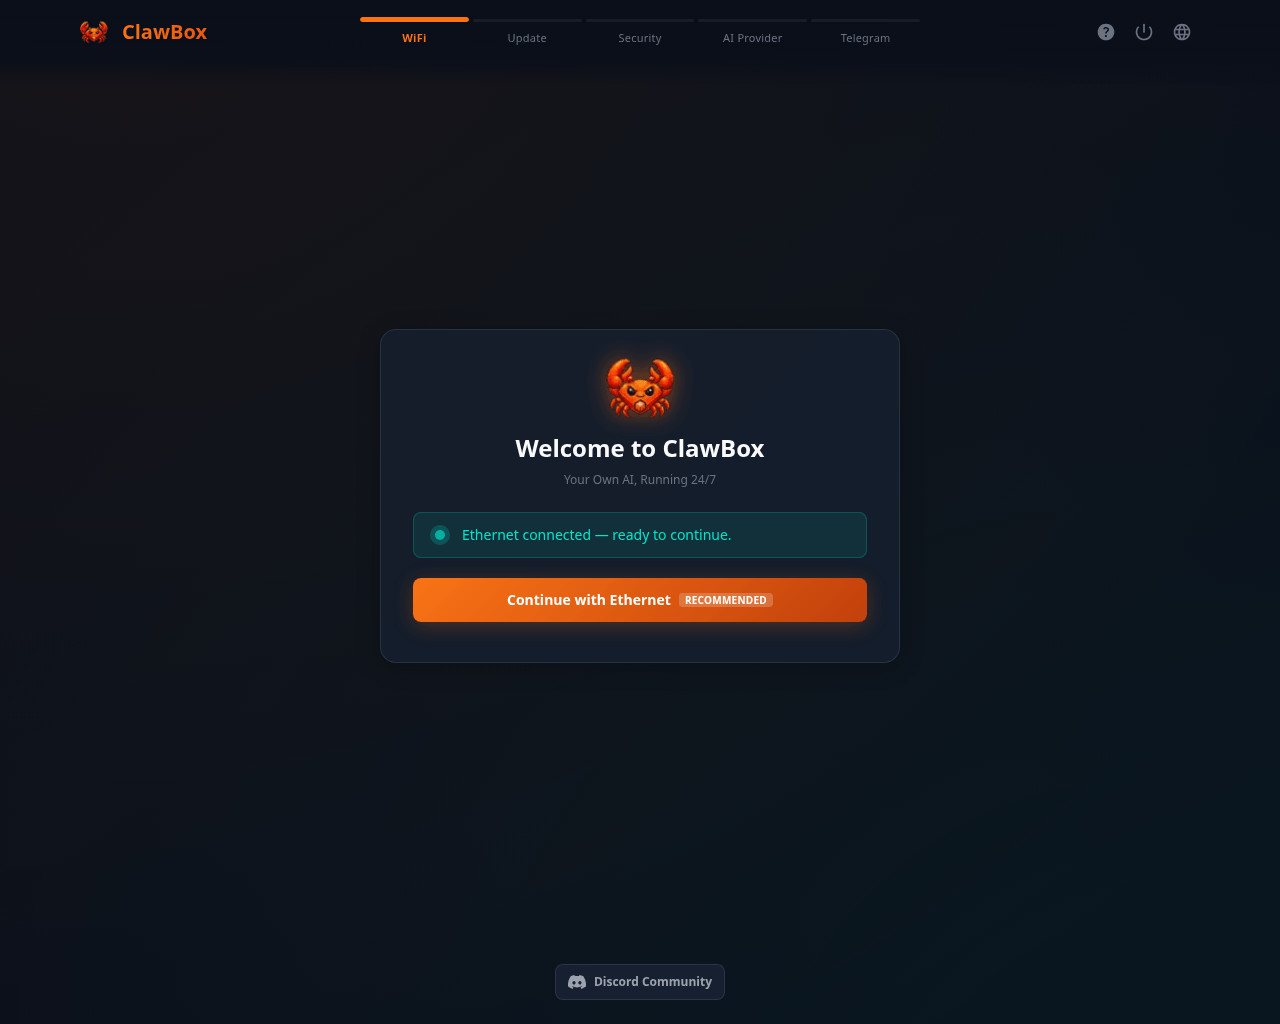
  1. Wi-Fi — pick your network and enter its password. Ethernet is detected automatically. The box then leaves the hotspot to join your network, so you have to rejoin your own Wi-Fi before the wizard continues.
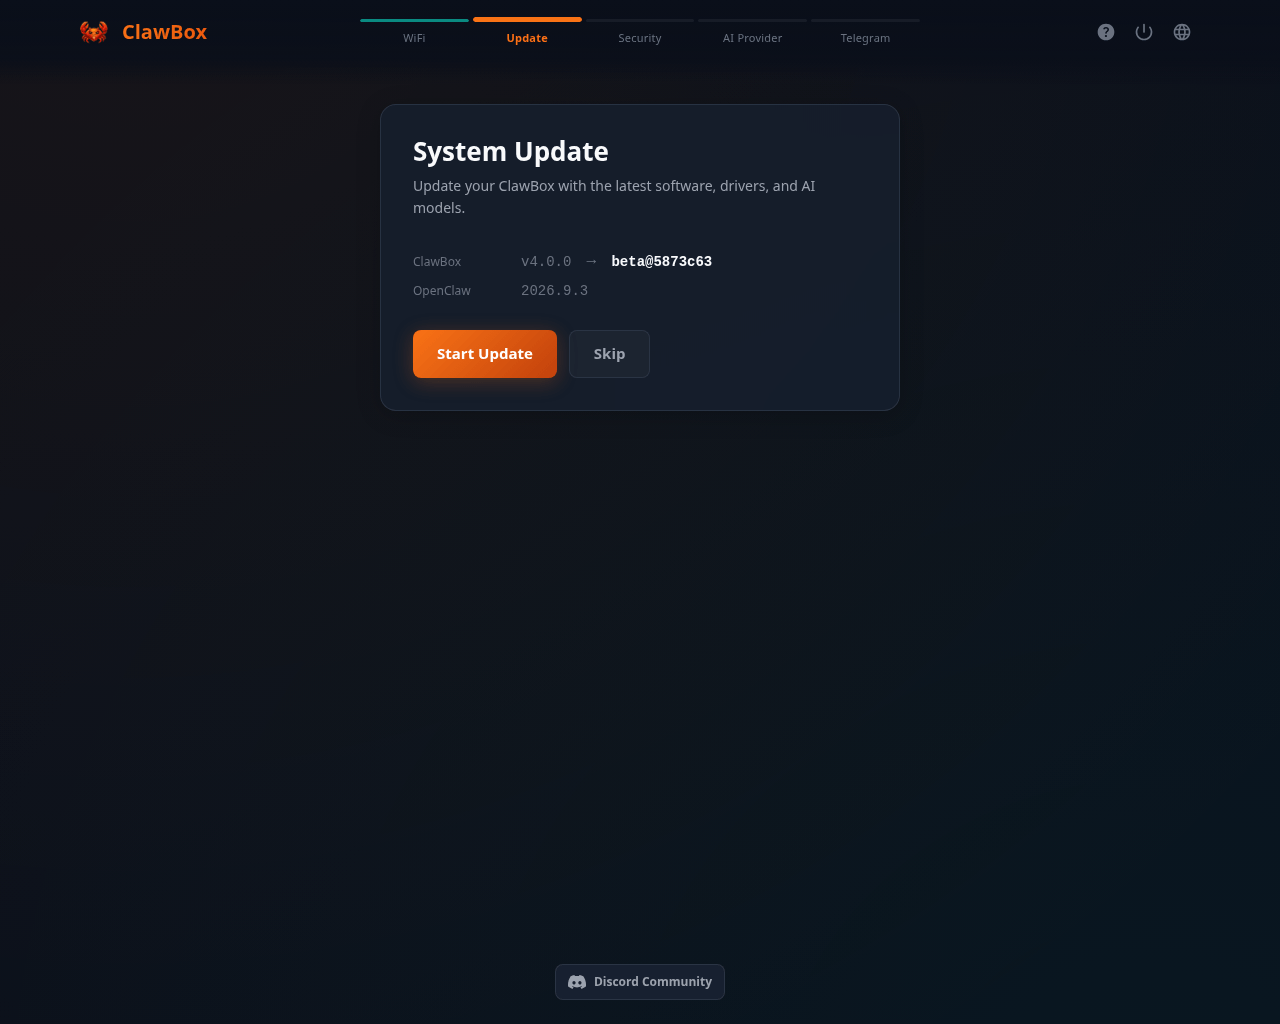
  2. Update — the box pulls the current release; the screen names the version it is on and the build it can move to, and the update can reboot the box. On an ordinary upgrade there is no way past this step but to take it. A Skip appears only when the box cannot reach the update server, when the build on offer is older than the one already running, or when an update has failed.
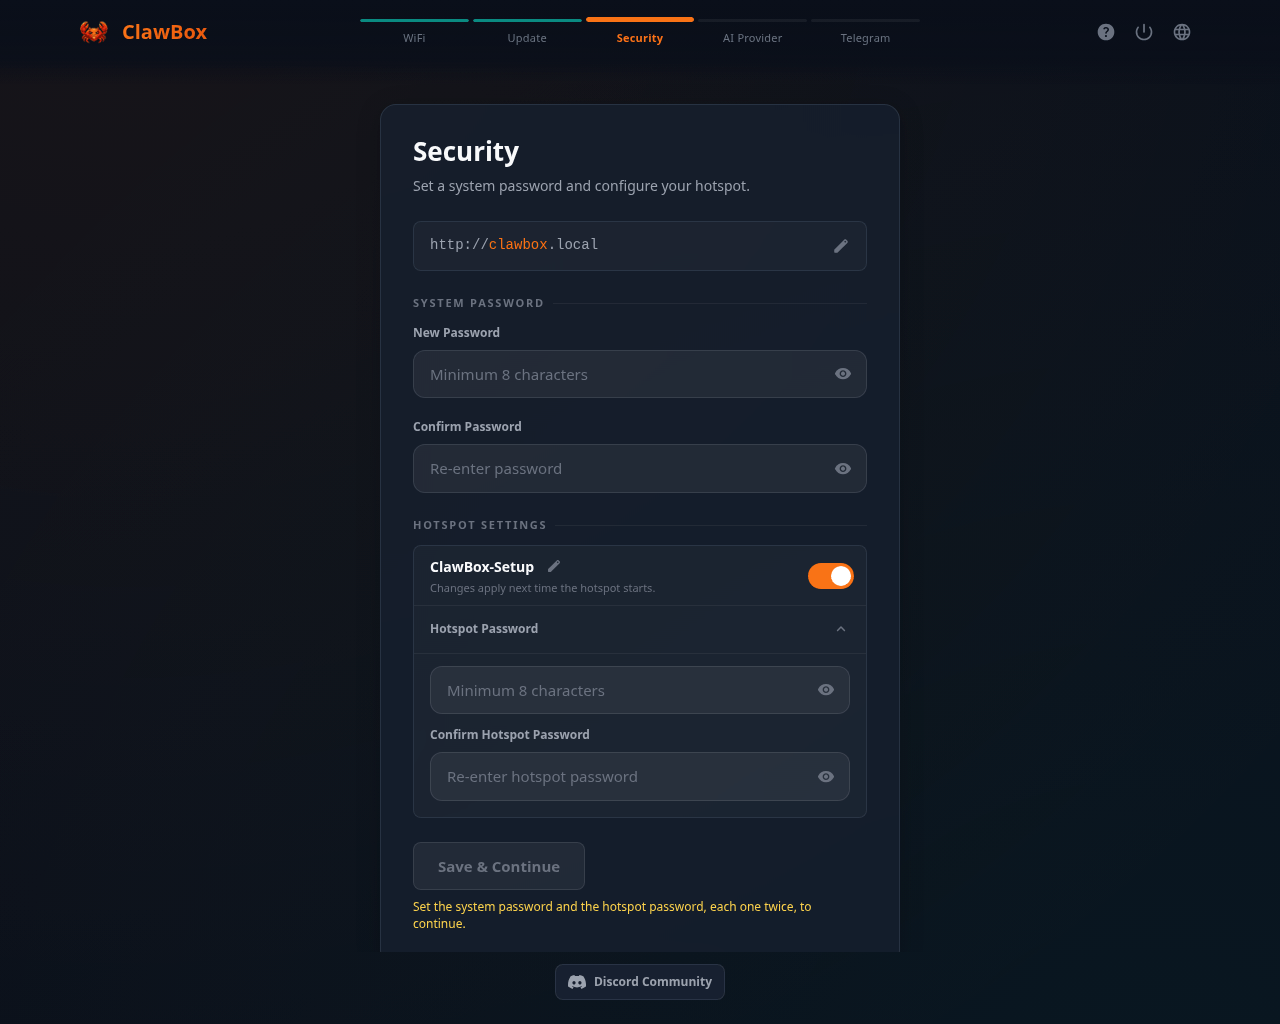
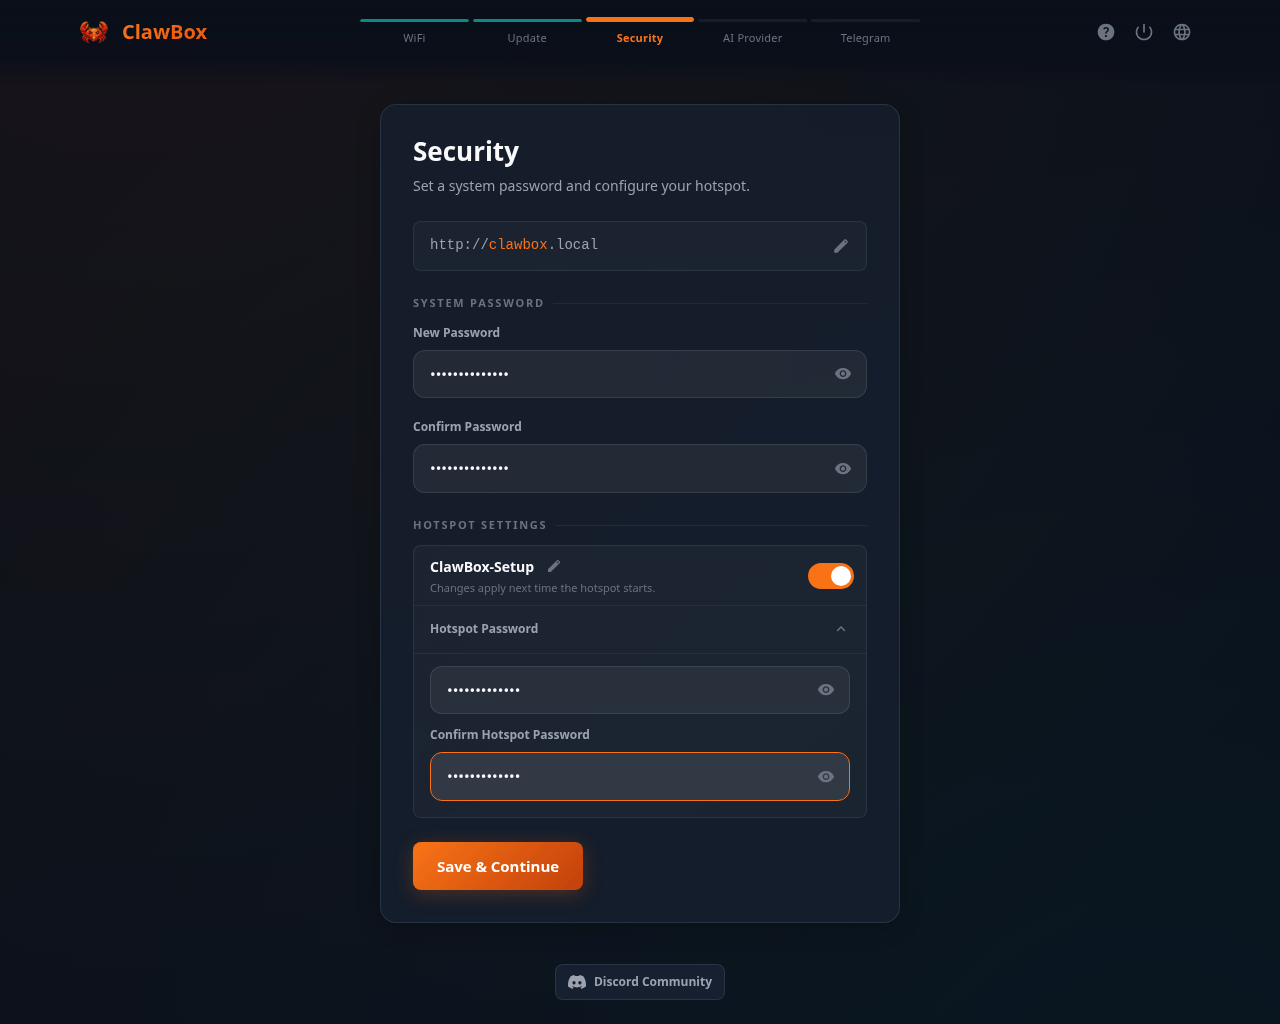
  3. Security — set the device password. It is the same password for the browser login and for SSH. You name the setup hotspot and give it its own password on the same screen; with the hotspot switched on, Save & Continue stays greyed out until both passwords are entered twice.
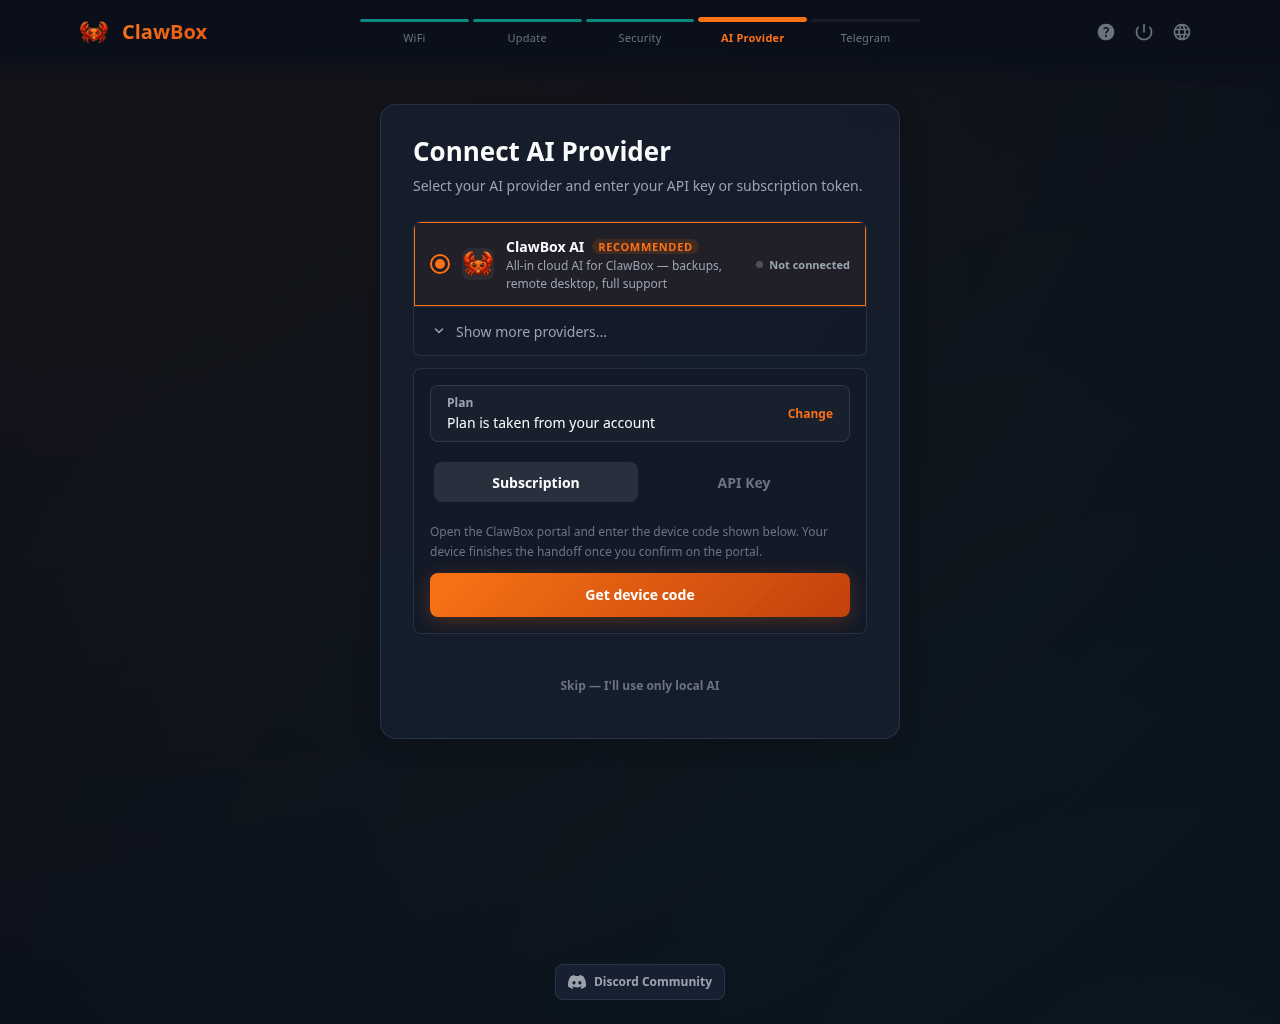
  4. AI provider — the step opens on ClawBox AI with its plan card; Show more providers… reveals the rest, and Skip — I’ll use only local AI is at the bottom. See Choose your AI provider. On a Hermes box this step drives Hermes’ own provider configuration — see AI Providers on Hermes.
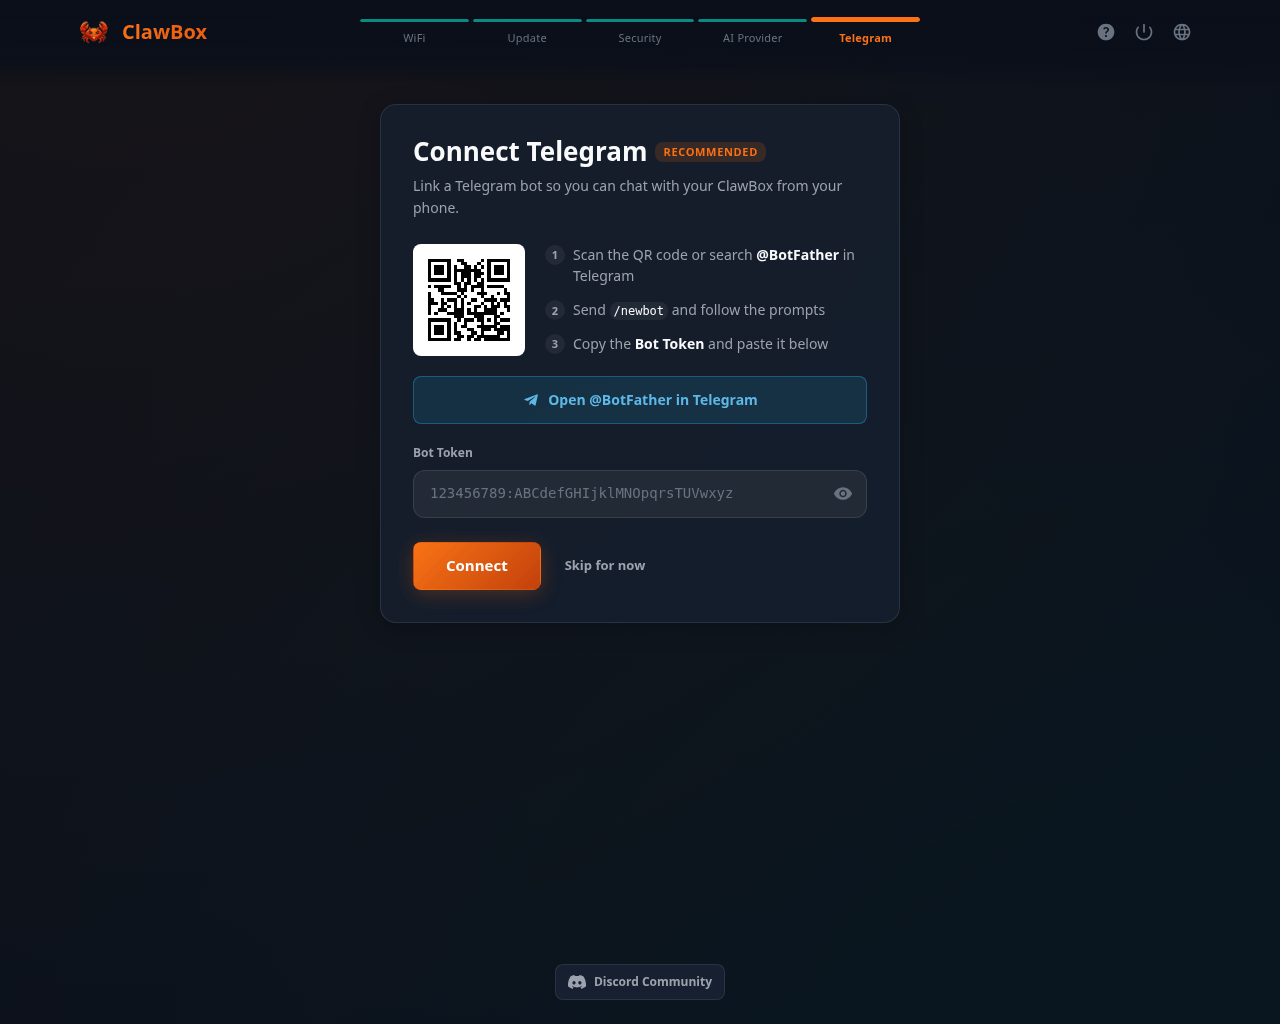
  5. Telegram (optional) — create a bot with @BotFather and paste its token. The wizard shows a QR code that opens BotFather on your phone. Skip is a first-class option; you can connect Telegram later from Settings, along with Discord, WhatsApp and email.
5

Start chatting

Setup finishes on the desktop. Open Chat and send your first message.
A reply to your first message means your ClawBox is live. 🦀

The wizard, screen by screen

These are the real screens, photographed on a freshly flashed box. Your own will differ in the version numbers, the network names and the clock. The strip across the top of each wizard screen — WiFi, Update, Security, AI Provider, Telegram — is the whole wizard, and it tells you how far along you are. The last screen below is the desktop, after the wizard has handed over.

Welcome

The setup wizard on its first step, WiFi: the crab mascot above the heading Welcome to ClawBox and the line Your Own AI, Running 24/7, a green dot beside the status Ethernet connected — ready to continue, and a Continue with Ethernet button badged RECOMMENDED.

The first screen, with the Ethernet cable already detected

With a cable plugged in the box has already found its network and Continue with Ethernet takes you straight on. Without one, this is where you pick your Wi-Fi network and enter its password.

Update

The System Update step, headed Update your ClawBox with the latest software, drivers, and AI models, listing ClawBox at v4.0.0 with an arrow to the beta build it can move to and OpenClaw at 2026.9.3, above a Start Update button and a Skip button.

The Update step before it starts: the version on the box, and the build it can move to

The screen names both pieces it can update — ClawBox itself and the agent — and what each is on now. Start Update can reboot the box. The Skip beside it is not normally offered. It appears only when the box cannot reach the update server, when the build on offer is older than the one already running, or when an update has failed — the capture above is one of those cases. An ordinary upgrade gives you Start Update and nothing else.

Security

The Security step headed Set a system password and configure your hotspot: an editable address field reading http dot slash slash clawbox dot local, a SYSTEM PASSWORD section with New Password and Confirm Password fields placeheld Minimum 8 characters, and a HOTSPOT SETTINGS section with the hotspot named ClawBox-Setup, its switch on, and Hotspot Password and Confirm Hotspot Password fields below it.

The Security step: one password for the box, one for its hotspot
The system password is the one you use for the browser login and for SSH. The hotspot keeps its own separate password, and the note under its name says changes apply the next time the hotspot starts.
The Security step with all four password fields filled in, each showing masked dots rather than readable characters, the Confirm Hotspot Password field outlined in orange where the cursor is, and the Save & Continue button below.

The same step filled in — the fields never show the password back to you

With the hotspot switched on, Save & Continue stays greyed out until all four fields are filled — the helper line underneath spells out that it wants the system password and the hotspot password, each one twice.
After you press Save & Continue the wizard may sit on the Security step instead of moving on. Reload the page in your browser and it continues from the next step.

AI Provider

The Connect AI Provider step with ClawBox AI selected and badged RECOMMENDED, described as all-in cloud AI for ClawBox with backups, remote desktop and full support and marked Not connected, a Show more providers link beneath it, Subscription and API Key tabs, a Get device code button, and a Skip — I'll use only local AI link at the bottom.

The AI Provider step opens on ClawBox AI
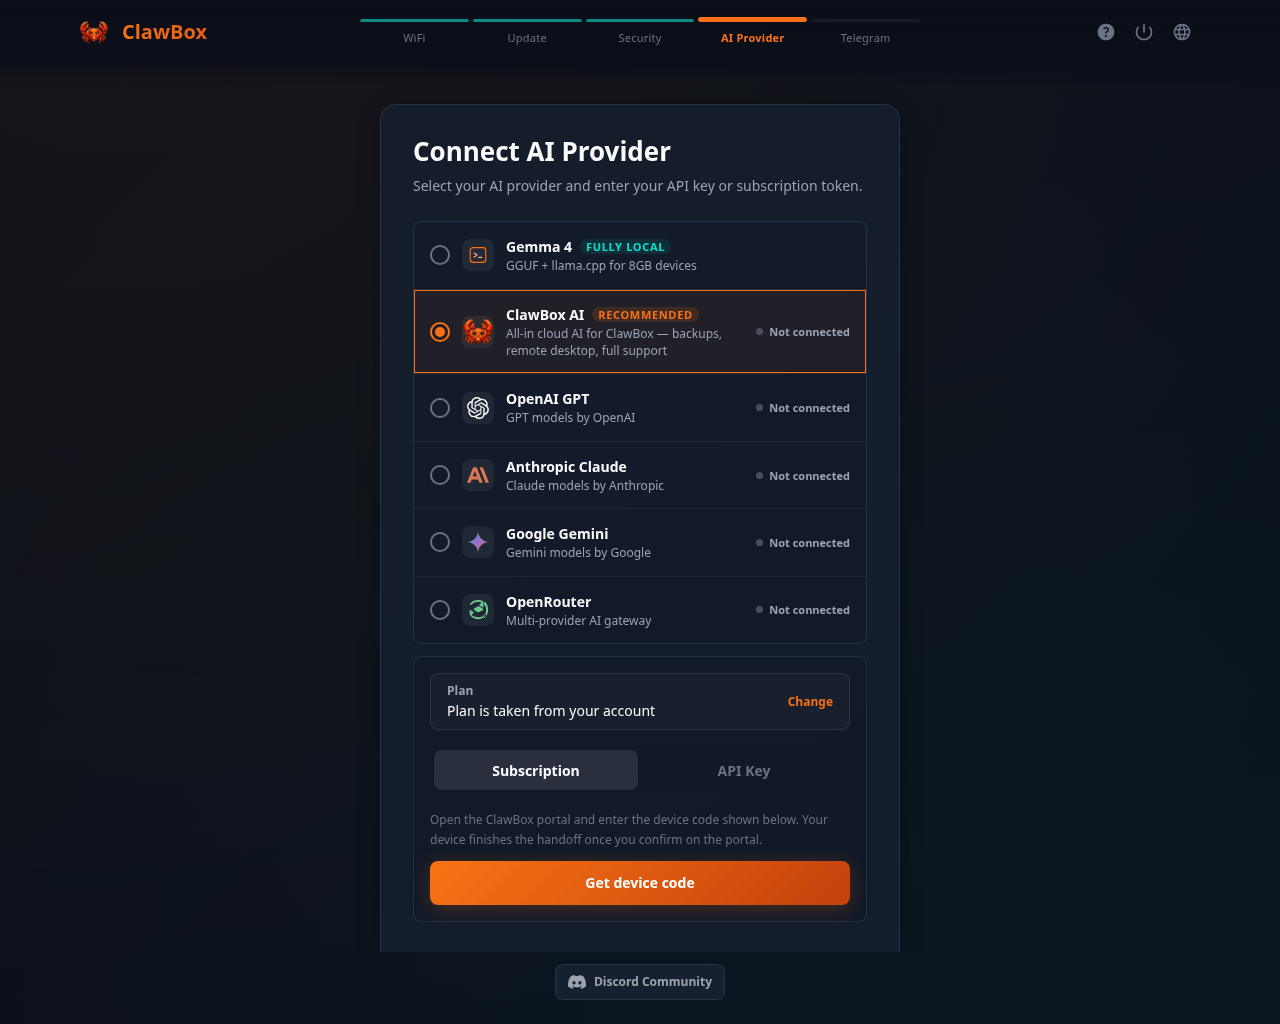
On the Subscription tab the box asks the portal for a device code and finishes the handoff once you confirm it there; the API Key tab takes a key instead.
The provider list expanded: Gemma 4 badged FULLY LOCAL and described as GGUF plus llama.cpp for 8GB devices, then ClawBox AI badged RECOMMENDED, then OpenAI GPT, Anthropic Claude, Google Gemini and OpenRouter, each marked Not connected.

Show more providers opens the full list, on-device model first

Gemma 4 at the top of the list is the one that runs on the box itself. The rest are cloud providers you connect with a subscription or a key — see Choose your AI provider.
Skip — I’ll use only local AI at the bottom of the step sometimes needs a second click before the wizard moves on. If the first click appears to do nothing, click it again.

Setting up the on-device model
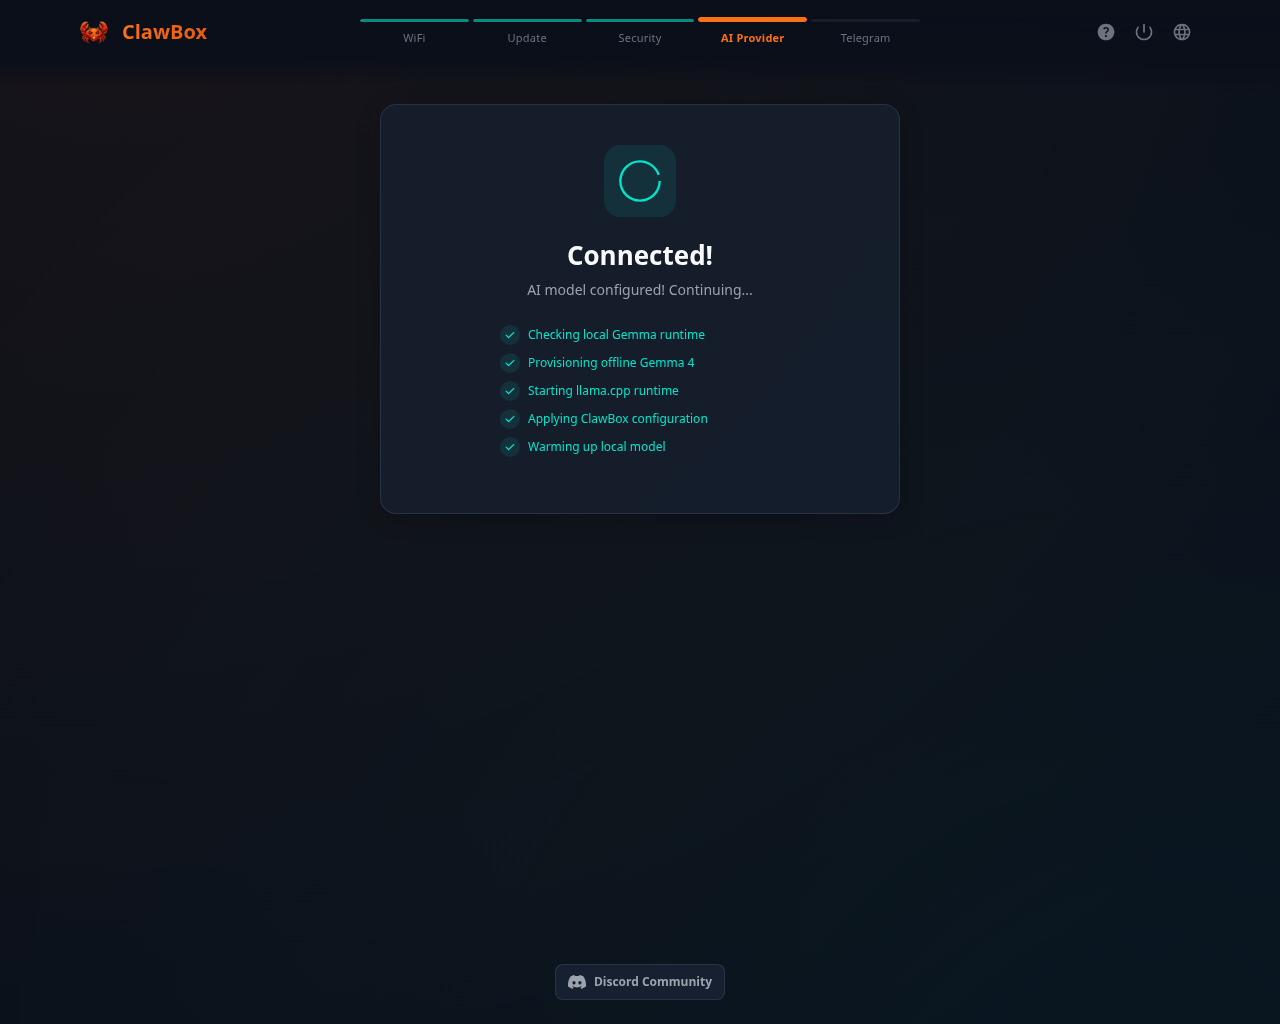
A progress card headed Connected! with the line AI model configured! Continuing, above a ticked checklist reading Checking local Gemma runtime, Provisioning offline Gemma 4, Starting llama.cpp runtime, Applying ClawBox configuration and Warming up local model.

Before it moves on, the box gets the local model ready

The checklist ticks its way through fetching the model, starting the runtime that serves it and warming it up. It moves on by itself when it is done.

Telegram

The Connect Telegram step badged RECOMMENDED, with a QR code beside three numbered instructions to scan the code or search @BotFather in Telegram, send slash newbot, and copy the Bot Token and paste it below, an Open @BotFather in Telegram button, a Bot Token field, and Connect and Skip for now buttons.

The Telegram step: make a bot, paste its token — or skip it

The QR code opens @BotFather on your phone. Skip for now is a real option — Telegram, Discord, WhatsApp and email can all be connected later from Settings.

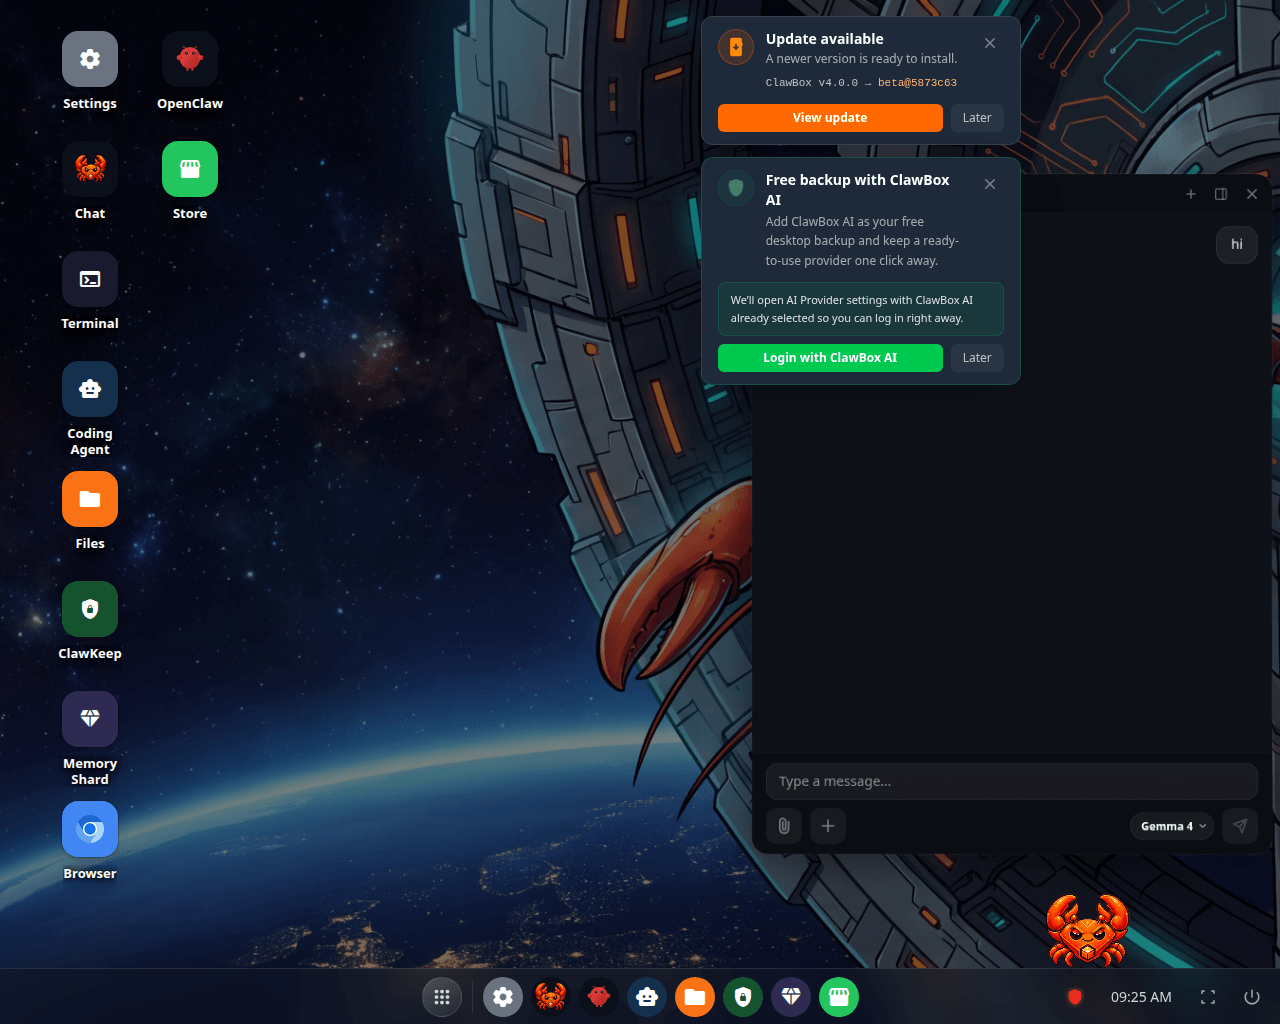
The desktop

The ClawBox desktop at the end of setup, app icons down the left for Settings, OpenClaw, Chat, Store, Terminal, Coding Agent, Files, ClawKeep, Memory Shard and Browser, and two cards in the top right: Update available offering to install a newer build, and Free backup with ClawBox AI offering to open the AI Provider settings with ClawBox AI already selected.

Setup ends here: the desktop, with whatever the box still wants from you

Both cards in the corner have a Later, and neither blocks anything. Open Chat and send your first message.

Reaching the device afterwards

Once the box has joined your network, the hotspot goes away and you reach it at:
  1. http://<device-ip> — always works; find the IP in your router’s client list (look for clawbox).
  2. http://clawbox.local — mDNS, convenient but not universally reliable.
If clawbox.local doesn’t load, disable any active VPN first (the most common cause), or use the device’s IP address. Some networks drop mDNS between Wi-Fi and wired segments entirely — Ethernet plus a DHCP reservation is the most reliable setup. See Networking.

Next steps

Chat

Switching model mid-conversation, slash commands, spoken replies.

Choose your AI

ClawBox AI, a subscription you already pay for, an API key, or the box itself.

Messaging channels

Telegram, Discord, WhatsApp and email.

Configure OpenClaw

Channels, voice, AI models, advanced options.